The Ultimate Guide on How to Use Masking in Adobe Illustrator
Content outline:
Masking in Adobe Illustrator used to be my pain and sadness, so I decided to deal with this issue once and for all. I hope this article will help all beginners who want to master the vector and avoid headaches about what to do and where to click while using masking. In fact, masks in Affinity Designer are made with no hassle at all, but we are where we are, so let’s look into Adobe Illustrator. I work in the latest version of the software so if you have anything that does not work properly, make sure you have the latest version installed.
Clipping Mask in Adobe Illustrator
The first thing, well-known to almost all, is cutting off objects that go beyond the edges of the image. The point is you place a figure of the desired size over your image and crop its borders. Note that in this case there should be two objects — the picture placed on the top and the one that should be “cut”. If you have a lot of elements on the image underneath, it should be grouped (select all and press Cmd / Ctrl+G). Otherwise, the Illustrator does not understand what exactly should be grouped.
Image -> Clipping mask -> Result

To make such a mask you need to:
- Select both objects, the one you want to use as a mask should be placed on top.
- Press Cmd / Ctrl+7 on your keyboard.
- Or go to the menu Object menu — Clipping Mask — Make (Object — Clipping Mask — Make).
- Or right-click the mouse – Make Clipping Mask (to create a clipping mask).
You can remove objects from the mask via Object menu — Clipping Mask — Release (Alt+Ctrl+7) so the picture will return to its original look. And it is also possible to move the clipping shape only if it is separately selected in layers.
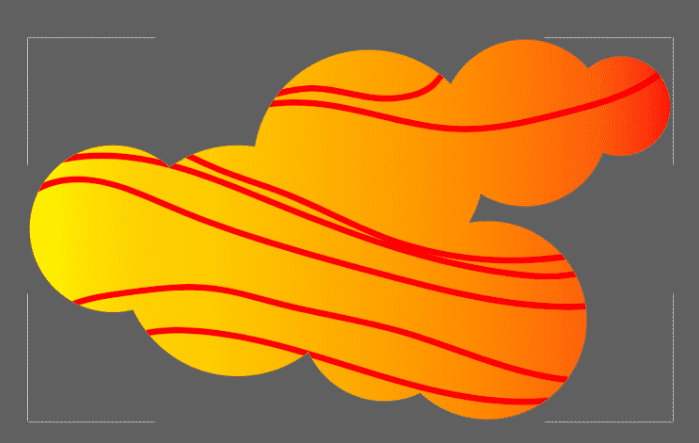
Draw Inside
This feature is almost the opposite of how a clipping mask works. In this case, you need to create a shape or an object you want to work with and then use the Draw Inside function.
- First of all, you need to create an object to use. It can be either a simple square, a circle or something complex. Its fill can be gradient or solid.
- Select an object.
- Press Shift+D twice.
- Or click the icon at the bottom of the left toolbar with a circle and a square.
Once you are in Draw Inside mode, you will see dotted frames around your object. Now when you are using the drawing tools like the Blob Brush Tool, you will be able to create lines inside that shape only. To exit this mode, press once Shift+D again. Press Alt+Ctrl+7 to remove the objects.
Opacity Mask
It comes to help when you need to create, for example, the transparency of a shape or a small gradient on the clipping shape. Different shades of gray are used to hide/show certain group/design details in Illustrator.
There is a rule in such a mask — dark colors hide, white ones show. Just like a shadow and light. So when you create an opacity mask, keep in mind that your picture will be the least visible at the place where the gradient is the darkest.
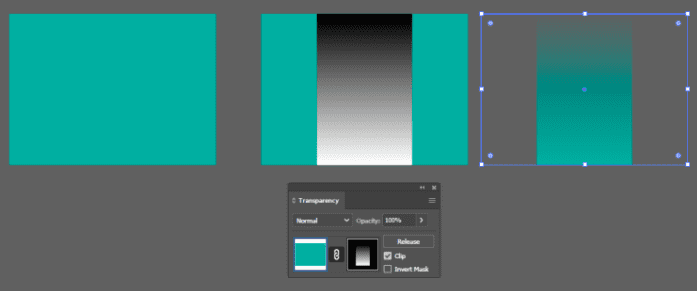
How to make:
- Open the Transparency panel and make sure that you are in Normal mode
- Select an image and a shape with a gradient.
- Click the “Mask” button on the panel. Note that you can also crop the image by shape (“Clip”) or invert the mask.
It is necessary to click Release to remove the mask. And to touch up the mask (gradient or position) it is required to click the square to the right of the chain on the panel – to fix what is necessary. Other objects in the layout are not available at all and many people still get lost why they are not available in layers. Click on the square to the left of the chain to get back to the layout itself. A check mark for Clip is necessary for stokers when they set transparency in a standard gradient through the property of transparency of a color marker, and then save it in an older 10th version of Illustrator. When you reopen this 10th version — there are parasitic halos around such gradients and it is necessary to go to the Transparency panel and click the tick Clip.
These are three basic ways to create masks in Adobe Illustrator. I hope you find this information helpful to you.
The Best Illustrator Addons Bundles
| Image | Title | Features | Price | Check it |
 |
12 in 1 ILLUSTRATOR Add-ons Bundle | Large collection of Illustrator add-ons 12 in 1 with an unprecedented discount | $27 | View |
 |
Vector GRINDER Toolkit: Retro Actions and Textures | POWERFUL Vector GRINDER is a new user-friendly tool to apply to vector and raster images texture opacity mask. | $19 | View |
 |
Machine Embroidery Photoshop Actions | Action set for Photoshop to create new images, ecards, posters, as the result will be 300 dpi ready to print. | $14 | View |
 |
VECTOR Ink Effects For Adobe Illustrator | Ink Styles Library with 6 styles (for versions CC and CS3+) | $9 | View |
 |
Vector Stamp Effects Styles | Easy to use, but with a great potential to create a vintage and retro designs in Illustrator. | $15 | View |